Raspberry Pi IOT
Explore limitless possibilities of Raspberry Pi IoT
What is a IoT simple definition?
The Internet of Things (IoT) is a network of physical objects with embedded technology that communicate, collect and exchange data. It enables machine-to-machine communication and can control connected objects like homes, vehicles, and industrial equipment. IoT uses data from connected devices to make decisions that benefit people and the environment, improving efficiency and reducing human effort. As technology advances and more objects become connected, the possibilities for IoT continue to grow.
Introduction to Raspberry Pi and IoT
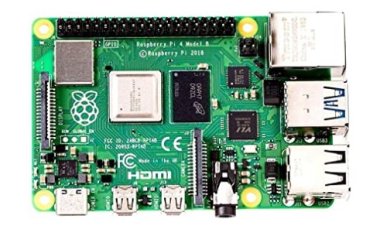
- The Raspberry Pi is a powerful single-board computer used to explore IoT by hobbyists, educators, and businesses.
- IoT refers to a network of connected computers, sensors, and actuators that interact and communicate over the internet.
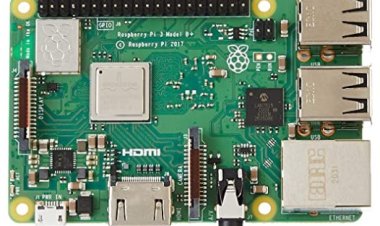
- The Raspberry Pi has a quad-core ARM Cortex-A53 processor, 1GB RAM, and a microSD card slot.
- It can be connected to other devices and programmed to interact with them.
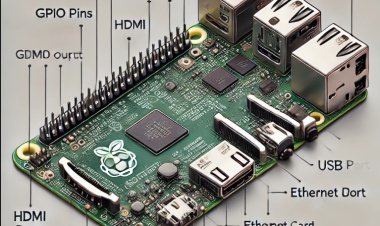
- The Raspberry Pi comes with GPIO pins, allowing easy interaction with various devices and components.
- It can be connected via Bluetooth, Wi-Fi, and USB to other devices and sensors.
- Its small size and low power consumption make it ideal for building IoT projects.
- Raspberry Pi can control electronics, create home automation systems, and integrate with security and monitoring systems.
- To start an IoT project with Raspberry Pi, gather the necessary components, install a Linux-based OS like Raspbian, and set everything up.
- Raspberry Pi's low cost and accessibility make it a great tool to explore IoT and enhance our homes and lives.
How to Connect Raspberry Pi to the Internet
To connect your Raspberry Pi to the internet, follow these steps:
- Gather Components:
- Raspberry Pi board (with power supply)
- MicroSD card (with Raspbian OS)
- Ethernet cable (or Wi-Fi dongle)
- Internet router with an active internet connection.
- Insert MicroSD Card:
- Place the microSD card with Raspbian into the Raspberry Pi's slot.
- Power Up:
- Connect the power supply and turn on the Raspberry Pi.
- Wired Connection (Optional):
- If using a wired connection, connect the Ethernet cable between the Raspberry Pi and the router.
- Wireless Connection (Optional):
- For Wi-Fi, click the network icon on the desktop, select your Wi-Fi network, and enter the password.
- Find IP Address:
- Open a terminal or use SSH to find the Raspberry Pi's IP address using `hostname -I`.
- Test Internet Connection:
- Open a web browser and check if you can access a website (e.g., Google).
- Alternatively, use `ping` command to test connectivity.
- Optional: Update Software:
- Run `sudo apt update` and `sudo apt upgrade` in the terminal to update software.
Now your Raspberry Pi is connected to the internet, allowing you to explore online resources and work on IoT projects or other tasks that require internet access.
Types of IoT Projects that can be Built with Raspberry Pi
The Raspberry Pi is a versatile platform for a wide range of IoT projects. Here are popular examples:
- Home Automation: Control lights, appliances, and thermostats remotely using a smartphone or voice commands.
- Weather Station: Collect and send weather data like temperature and humidity to a web server for analysis.
- Smart Security System: Monitor home security with motion detection, video surveillance, and phone notifications.
- Automated Garden: Automate watering systems and monitor soil moisture and weather data.
- Smart Mirror: Display weather, calendar events, and news on a smart mirror.
- Smart Door Lock: Use a smartphone or custom authentication for door unlocking.
- Home Energy Monitor: Track energy usage for efficiency and cost savings.
- IoT Weather Clock: Show real-time weather information on a clock with dynamic design updates.
- Smart Pet Feeder: Schedule or remotely dispense pet food.
- Smart Thermostat: Adjust temperature based on user preferences for energy efficiency.
- Smart Voice Assistant: Transform Raspberry Pi into an Alexa or Google Assistant-like device.
- IoT Aquarium Monitor: Control and monitor aquarium conditions remotely.
- Automated Plant Watering: Water plants based on moisture levels.
- DIY Home Security Camera: Set up a DIY camera system for remote monitoring.
- Health Monitoring System: Track vital signs like heart rate, temperature, and blood pressure.
These projects showcase the Raspberry Pi's flexibility, low cost, and strong community support for exploring the exciting possibilities of IoT. Remember to prioritize security measures to protect privacy and data safety.
Programming Languages & Tools for Raspberry Pi IoT Development
The Raspberry Pi is a powerful and versatile platform for IoT development, offering a wide range of programming languages and tools. Here are the steps to get started with Raspberry Pi IoT development:
- Choose the Raspberry Pi Model: Select the Raspberry Pi board that suits your project's requirements. The latest models offer more processing power and features.
- Install Operating System: Download and install the Raspbian OS or any other compatible operating system on the microSD card.
- Connect to the Internet: Follow the previous instructions to connect your Raspberry Pi to the internet either through Ethernet or Wi-Fi.
- **Select a Programming Language:
- Python: Ideal for beginners with its simplicity and vast collection of libraries for IoT development.
- C: Suitable for more complex projects where speed and efficiency are crucial.
- Java: Offers object-oriented programming and is well-suited for IoT applications.
- Set Up Development Environment: Install the required programming language's development tools on the Raspberry Pi.
- Explore GPIO Libraries: For Python development, use the GPIO library to interact with the Raspberry Pi's pins and sensors.
- Experiment with Scratch (Optional): Scratch provides a graphical environment for easy coding without writing text-based code.
- Leverage Open Source Frameworks: Explore available frameworks like Flask for web application development on the Raspberry Pi.
- Start Your Project: Begin developing your IoT project using the selected programming language and tools.
- Test and Iterate: Regularly test your project on the Raspberry Pi, debug any issues, and iterate to improve its functionality.
- Document and Share: Document your project's progress and findings to share with the Raspberry Pi community and contribute to the knowledge base.
In conclusion, the Raspberry Pi offers various programming languages and tools, such as Python, C, Java, and Scratch, making it an excellent platform for IoT development. By following these steps, you can create sophisticated and powerful IoT projects on the Raspberry Pi.
Potential Applications of Raspberry Pi IoT Solutions
The Raspberry Pi has a variety of potential applications in the IoT space due to its affordability, flexibility, energy efficiency, and ease of use. Here are some key applications of Raspberry Pi IoT solutions:
- Home Automation: Raspberry Pi is popular for controlling devices like lights, window blinds, thermostats, and security systems in a single platform, creating customized home automation systems.
- Smart Homes: Raspberry Pi powers smart home features like automated lighting, heating, security, and entertainment systems, making managing a smart home easier.
- Robotics: Raspberry Pi is a powerful platform for developing robotics projects, enabling the creation of semi-autonomous robots with the addition of hardware components and sensors.
- Internet of Things (IoT): Raspberry Pi acts as the backbone of IoT networks by connecting various components like sensors, relays, and controllers to create analytics-driven IoT systems for monitoring and controlling interconnected devices.
The Raspberry Pi has quickly become a popular tool for a variety of projects, empowering developers to create powerful applications for home automation, robotics, and IoT. As more developers take advantage of these possibilities, the use cases for Raspberry Pi IoT solutions will continue to grow.
