Supercharge Your Raspberry Pi 2 Connectivity with Expert Tips
Transform your Raspberry Pi 2 experience with these expert tips. Feel the difference in performance and connectivity!
Introduction to Raspberry Pi 2 Connectivity
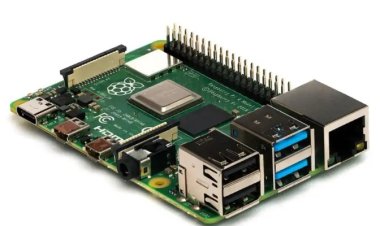
The Raspberry Pi 2, a famous single-board PC, offers a scope of network choices that improve its flexibility for different tasks. Presented in February 2015, the Raspberry Pi 2 is outfitted with a few key connection points that empower it to collaborate with outside gadgets and organizations.
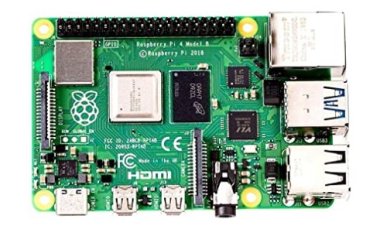
USB Ports: The Raspberry Pi 2 highlights four USB 2.0 ports, permitting clients to interface peripherals like consoles, mice, and outside stockpiling gadgets. This pursues it an adaptable decision for both fundamental and complex arrangements.
HDMI Output: A HDMI port gives superior quality video and sound result, making it simple to interface the Raspberry Pi 2 to screens, televisions, or projectors for mixed media applications.
Ethernet Port: The underlying Ethernet port offers dependable organization availability, fundamental for web access and arranged projects. It upholds wired systems administration, which is essential for steady and rapid web associations.
Sound Output: A 3.5mm sound jack is accessible for interfacing speakers or earphones, conveying sound close by video through the HDMI port.
GPIO Pins: The Broadly useful Information/Result (GPIO) pins take into consideration equipment connecting and custom hardware projects, like controlling LEDs or sensors.
These network choices make the Raspberry Pi 2 a vigorous stage for different applications, from instructive tasks and home robotization to media focuses and IoT gadgets.
Network Interfaces (Ethernet and Wi-Fi) on Raspberry Pi 2
The Raspberry Pi 2 offers essential network connectivity options, including Ethernet, which supports reliable wired connections, and, in later models, integrated Wi-Fi for wireless networking. Here’s a closer look:
- Ethernet
- Port: The Raspberry Pi 2 is equipped with a 10/100 Mbps Ethernet port.
- Functionality: This port allows for stable and fast wired internet access. It is crucial for applications requiring reliable network performance, such as servers, networked media centers, and internet-of-things (IoT) devices.
- Setup: Simply connect an Ethernet cable from the Raspberry Pi 2 to your router or switch. The device should automatically obtain an IP address via DHCP.
- Wi-Fi
- Availability: The Raspberry Pi 2 does not have built-in Wi-Fi. However, later models like the Raspberry Pi 3 and 4 include integrated Wi-Fi capabilities.
- Add-On Solutions: For the Raspberry Pi 2, external USB Wi-Fi adapters can be used to provide wireless connectivity. These adapters plug into one of the USB ports and require configuration.
- Configuration: Install the necessary drivers and configure the Wi-Fi settings through the Raspberry Pi OS network manager or via command line tools. This typically involves connecting to the Wi-Fi network and entering network credentials.
While the Raspberry Pi 2 relies on Ethernet for built-in networking, external USB Wi-Fi adapters offer a way to add wireless connectivity for more flexibility in deployment and project setups.
USB and Peripheral Connectivity on Raspberry Pi 2
The Raspberry Pi 2 offers several USB and peripheral connectivity options that expand its functionality and versatility.
#USB Ports
- Ports: The Raspberry Pi 2 is equipped with four USB 2.0 ports.
- Functionality: These ports allow you to connect various peripherals such as keyboards, mice, external hard drives, and USB hubs. This makes it easy to turn the Raspberry Pi 2 into a fully functional desktop computer or to add storage and other accessories.
Peripheral Devices
- Keyboards and Mice: Connect a USB keyboard and mouse to control the Raspberry Pi 2. These are essential for interacting with the system, especially during setup and for regular use.
- External Storage: USB ports can also be used to attach external storage devices like USB flash drives or hard drives, providing additional storage space for files and projects.
- Hubs: If you need more USB ports, you can connect a USB hub to one of the available ports, allowing you to expand the number of connected devices.
These USB and peripheral connectivity options make the Raspberry Pi 2 highly adaptable for various uses, from basic computing tasks to more complex projects involving multiple accessories and devices.
GPIO and Expansion Options on Raspberry Pi 2
The Raspberry Pi 2 is equipped with General Purpose Input/Output (GPIO) pins that provide extensive expansion options, making it a versatile tool for various electronics projects.
GPIO Pins
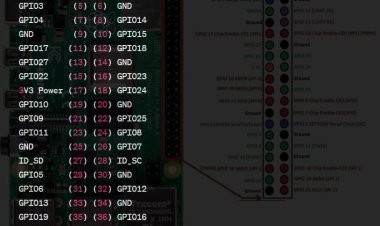
- Configuration: The Raspberry Pi 2 features a 40-pin GPIO header, which includes a mix of digital I/O pins, power supply pins, and ground pins.
- Functionality: These GPIO pins can be used for a wide range of purposes, including reading data from sensors, controlling LEDs, and interfacing with other electronic components. They allow for custom hardware projects and prototyping.
- Access: The pins are divided into several categories: power (3.3V and 5V), ground, and GPIO pins that can be configured as inputs or outputs. Specific pins also support additional functions like serial communication (UART), pulse-width modulation (PWM), and I²C communication.
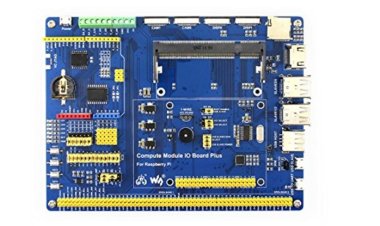
Expansion Options
- HATs: Hardware Attached on Top (HAT) accessories can be mounted on the GPIO header. HATs are expansion boards with built-in EEPROMs that provide configuration and identification data, simplifying integration and ensuring compatibility.
- Breadboards: GPIO pins can be easily connected to a breadboard for prototyping. This setup allows you to experiment with circuits and components without soldering.
- Custom Shields: You can design custom expansion boards or shields that plug into the GPIO header, tailored to specific project needs. These can be used to extend the Raspberry Pi’s functionality for particular applications, like robotics or automation.
The GPIO and expansion options on the Raspberry Pi 2 make it a powerful platform for developing a wide range of electronic projects, from simple gadgets to complex systems.
Troubleshooting Common Connectivity Issues
Connectivity problems with your Raspberry Pi 2 can be frustrating, but many issues have straightforward solutions. If you’re having trouble with Ethernet, ensure the cable is securely connected and the router or switch is powered on. Check the network settings on the Raspberry Pi 2 by running `ifconfig` in the terminal to confirm that it has obtained an IP address. For Wi-Fi issues, if using a USB adapter, make sure it’s properly connected and recognized by running `lsusb`. Verify that you’ve entered the correct network credentials and that the Wi-Fi network is within range. In both cases, restarting the Raspberry Pi and your router can resolve temporary issues. For USB peripherals, ensure they are properly plugged in and try different ports if they’re not recognized. Sometimes, issues may arise from power supply problems, so using a reliable 5V power source is crucial. By systematically checking these areas, you can quickly identify and resolve most common connectivity problems with your Raspberry Pi 2 connectivity.