Level Up Your Fun: Raspberry Pi Retro Gaming Guide
Dive into nostalgia with our comprehensive guide to Raspberry Pi gaming.

Introduction
The Raspberry Pi, a petite yet powerful computer, has gained widespread popularity for its versatility. It serves various purposes, ranging from a home theatre PC (HTPC) to a programming hub and even a gaming console. However, one of its most intriguing applications is in the realm of retro gaming.
Transforming your Raspberry Pi into a retro gaming haven is an exciting journey into the past, allowing you to indulge in classic video games. Emulation software, such as RetroPie, makes this possible, enabling you to play arcade and console gems effortlessly. Picture reliving the magic of iconic titles like Super Mario Bros. and Sonic the Hedgehog with unparalleled ease.
Getting your Raspberry Pi game-ready is a straightforward process. Once you've secured ROMs for your desired games, installing the necessary emulation software becomes a breeze. Whether you opt for RetroPie's website download or NOOBS, the setup remains hassle-free.
Next, transferring your game ROMs to the Pi completes the setup. Once done, you're all set to embark on a nostalgic gaming journey. Launching your games is a seamless experience—choose between the user-friendly EmulationStation front end or the command line.
Retro gaming on the Raspberry Pi offers a delightful trip down memory lane, allowing you to effortlessly revisit the gaming landscapes of yesteryears. It's a cost-effective, user-friendly solution that promises endless enjoyment with your cherished classics. Don't hesitate—grab a Raspberry Pi and rediscover the joy of your childhood games.
Setting up your Raspberry Pi Retro Gaming System
Embarking on the adventure of setting up your Raspberry Pi as a Retro Gaming System is a rewarding journey into the world of classic games. Follow these steps to seamlessly transform your Raspberry Pi into a retro gaming powerhouse:
Step 1: Gather Your Gear
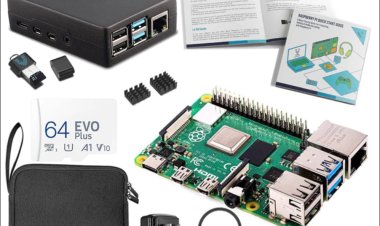
Ensure you have the essentials:
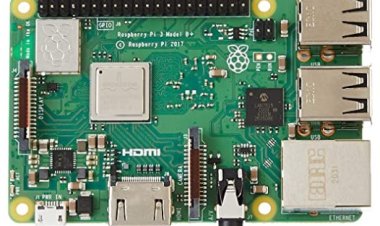
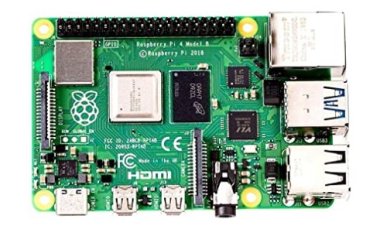
Raspberry Pi (any version should work)
MicroSD card (16GB or larger recommended)
Power supply
HDMI cable
USB controllers or keyboard/mouse
Step 2: Choose Your Emulation Software
Opt for RetroPie, a comprehensive emulation software. Download the RetroPie image from the official website.
Step 3: Flash RetroPie to MicroSD Card
Use a tool like Etcher to flash the RetroPie image onto the MicroSD card. Insert the card into your Raspberry Pi.
Step 4: First Boot
Power up your Raspberry Pi. RetroPie will guide you through initial setup. Configure your controllers and connect to Wi-Fi if needed.
Step 5: Acquire Game ROMs
Legally obtain game ROMs for the systems you want to emulate. Place them on a USB drive.
Step 6: Transfer ROMs to Raspberry Pi
Connect the USB drive to your Raspberry Pi. RetroPie will recognize it and transfer the ROMs to the appropriate directories.
Step 7: Configure Controllers
Access the RetroPie menu and configure your controllers for a seamless gaming experience.
Step 8: Explore Additional Settings
Fine-tune your RetroPie settings, including screen resolution, audio, and any other preferences.
Step 9: Start Gaming
Launch RetroPie's user-friendly interface, EmulationStation, and start exploring and playing your favorite retro games.
Step 10: Optional - Customize and Expand
Explore additional features, themes, and options within RetroPie. Consider adding more emulators or tweaking settings to enhance your gaming experience.
Congratulations! Your Raspberry Pi is now a fully functional Retro Gaming System. Enjoy the nostalgia and relive the magic of classic games on your modern mini-computer.
Customizing Controllers for Optimal Gameplay
Achieving optimal gameplay on your RetroPie-powered Raspberry Pi involves customizing controllers to suit your preferences. Follow these steps to fine-tune your controller settings:
Step 1: Access RetroPie Menu
Navigate to the main RetroPie menu using your connected controller or keyboard.
Step 2: Configure Input
Select "Configure Input" to initiate the controller configuration process.
Follow on-screen instructions to map each button on your controller. Ensure accuracy for the best gaming experience.
Step 3: Hotkey Configuration
Set up hotkeys for functions like save/load states, exit emulator, etc. These are crucial for efficient gameplay.
Access the "Configure Input" option again and assign hotkeys as prompted.
Step 4: Test Your Configuration
Launch a game to ensure your controller configuration works seamlessly.
Adjust settings as needed, repeating the process until you're satisfied.
Step 5: Fine-Tune Sensitivity (Optional)
In RetroPie, you can fine-tune analog stick sensitivity for more precise control.
Navigate to the RetroPie menu, go to "RetroPie Setup," and choose "Configuration/Tools." From there, select "rpie-advancemame," and adjust settings to your liking.
Step 6: Explore RetroArch Settings
RetroPie uses RetroArch for emulation, offering extensive customization options.
Access the RetroPie menu, go to "RetroArch," and explore settings. Adjust input-related configurations, shaders, and other preferences.
Step 7: Save Configurations
After customizing, ensure you save your configurations.
Navigate to the main menu, select "Configuration," and choose "Save Configuration."
Step 8: Test Different Emulators
Depending on the emulator you're using, controller configurations may vary.
Experiment with different emulators within RetroPie to find the one that suits your preferences.
Step 9: Utilize Controller Shortcuts
Take advantage of controller shortcuts for quick actions during gameplay.
Refer to the documentation for your specific controller to learn about available shortcuts.
Step 10: Enjoy Optimized Gameplay
With your controllers finely tuned, you're now ready to enjoy a smooth and customized gaming experience on your Raspberry Pi Retro Gaming System.
Configuring Retro Gaming Controllers for Raspberry Pi
Configuring retro gaming controllers for your Raspberry Pi is a key step to ensure a seamless and enjoyable gaming experience.
Begin by connecting your controller to one of the USB ports on your Raspberry Pi; RetroPie supports a variety of controllers, including USB and Bluetooth options. Once connected, navigate to the main RetroPie menu using your controller, and select "RetroPie Setup" to access the setup interface.
Ensure your RetroPie setup script is updated to the latest version to guarantee compatibility with your controller. In the RetroPie setup, go to "Configuration / Tools" and select "Configure basic libretro emulator options." Follow the on-screen instructions to map your controller buttons, ensuring each button is correctly configured.
Next, set up hotkeys for essential functions such as saving and loading game states, accessing the RetroPie menu, and exiting emulators. Saving your controller and hotkey configurations ensures that your settings are applied consistently.
For controllers with analog sticks, you have the option to configure their sensitivity in the RetroPie setup under "Configuration / Tools." This step is optional but can enhance the precision of your controls.
Test your controller configuration by launching a game and ensuring that all buttons and functions work as expected. Make any necessary adjustments.
Explore additional customization options in RetroArch settings for features such as input settings, shaders, and other preferences. Save these configurations to ensure your preferences are retained for future gaming sessions.
Take advantage of controller shortcuts for quick actions during gameplay, referring to your controller's documentation for available shortcuts.
With your controllers configured and personalized, you're now ready to enjoy a nostalgic journey through classic games on your Raspberry Pi. Sit back, relax, and immerse yourself in the world of retro gaming. Following these steps will provide you with a customized and optimized retro gaming controller setup on your Raspberry Pi.
Building Your Own Retro Gaming Cabinet with Raspberry Pi
Building a retro gaming cabinet with a Raspberry Pi is a fun and customizable project that allows you to experience classic games from the 1980s and 90s. Here's a condensed guide to help you get started:
- Gather Hardware:
Collect a Raspberry Pi and necessary peripherals (controllers, speakers).
Ensure the Pi can power additional hardware like a monitor if needed.
- Set Up Raspberry Pi:
Connect the Pi to a monitor and keyboard, and plug in the power supply.
Load Raspbian, a Linux-based OS optimized for the Raspberry Pi.
- Load Emulators and ROMs:
Install emulators to run games from various platforms.
Load ROMs, which are the game files read and played by the emulator.
- Customize Cabinet Hardware:
Have fun customizing your cabinet with decorative panels, arcade buttons, and joysticks.
Connect buttons and joysticks to the Raspberry Pi for game inputs.
- Set Up Cabinet Software:
- Install software to make buttons and joysticks work in games.
- Download specific drivers for each device and ensure proper setup.
- Finalize Setup:
- Ensure all hardware and software connections are correct.
- Your retro gaming cabinet is now ready to use, providing a nostalgic gaming experience.
By following these steps, you'll create your own retro gaming cabinet with a Raspberry Pi, allowing you to enjoy classic titles in a personalized gaming environment.
Conclusion
The Raspberry Pi Retro Gaming trend is thriving, offering a broad spectrum of gaming possibilities, from simple Raspberry Pi Zero projects to intricate setups with USB gamepads. Retro gaming enthusiasts can find abundant tutorials and guides within the community to inspire and assist them in creating their own gaming machines.
Even for beginners, the Raspberry Pi's Linux-based operating systems, though initially daunting for some Linux users, provide a user-friendly entry point to enjoy classic games from home. The Raspberry Pi serves as an excellent tool to inject new life into retro gaming, offering easy setup and extensive customization options. It stands as a fantastic platform for those seeking a nostalgic gaming experience.