Broadcom BCM2836: Elevate Raspberry Pi 2 with Powerful Quad-Core
Discover how the Broadcom BCM2836 transforms the Raspberry Pi 2 with its powerful quad-core performance, boosting speed and efficiency for your projects.
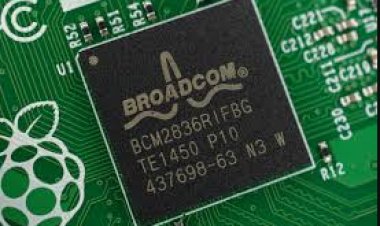
Introduction to the Broadcom BCM2836
The Broadcom BCM2836 is the beating heart of the Raspberry Pi 2, a beloved single-board computer among tech enthusiasts. Launched in February 2015, this quad-core ARM Cortex-A7 processor brought a significant leap in performance over the older BCM2835 used in the original Raspberry Pi. Running at 900 MHz, the BCM2836 offers a noticeable boost in processing power, enabling the Raspberry Pi 2 to handle more demanding tasks and multitasking with ease.
This chip packs a VideoCore IV GPU, which means it can handle 1080p video playback and 3D graphics without breaking a sweat. This makes it perfect for multimedia projects and educational tools. Alongside the powerful CPU and GPU, there's 1GB of RAM, ensuring smoother and more efficient operation of software and applications.
A standout feature of the BCM2836 is its energy efficiency. Despite its enhanced capabilities, it maintains low power consumption, making the Raspberry Pi 2 an excellent choice for hobbyists, educators, and developers who need a cost-effective and efficient computing solution.
In essence, the Broadcom BCM2836 is a versatile and powerful chip that has greatly contributed to the success and popularity of the Raspberry Pi 2. It opens up a myriad of possibilities for innovation and creativity, making it a cornerstone in the world of affordable, powerful computing.
Key Features of the Raspberry Pi 2
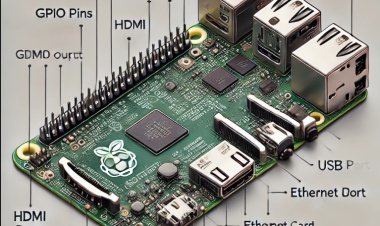
The Raspberry Pi 2 truly shines in the realm of single-board computers thanks to its impressive blend of features, making it a versatile choice for a multitude of projects. At its core is the Broadcom BCM2836 SoC, which houses a quad-core ARM Cortex-A7 CPU running at 900 MHz. This setup offers a notable performance improvement over earlier models, allowing the Raspberry Pi 2 to handle more demanding tasks and multitasking with greater ease.
A standout feature is the integrated VideoCore IV GPU, which supports smooth 1080p video playback and 3D graphics. This capability makes the Raspberry Pi 2 ideal for multimedia applications and even gaming projects. Coupled with 1GB of RAM, users experience enhanced performance and smoother operation across various applications.
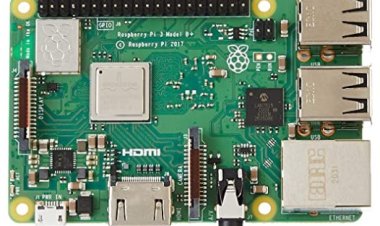
Connectivity is another area where the Raspberry Pi 2 excels. It comes equipped with four USB 2.0 ports for connecting peripherals like keyboards, mice, and external storage. The HDMI port facilitates a connection to monitors or TVs, while the 3.5mm audio jack provides sound output. For networking, the Ethernet port ensures reliable internet access.
The Raspberry Pi 2 is also noted for its power efficiency. It achieves a balance of high performance with low power consumption, making it well-suited for continuous use in projects ranging from educational tools to home automation systems.
In summary, the Raspberry Pi 2 is a powerful, budget-friendly, and adaptable platform, making it a go-to choice for a broad array of applications and creative endeavors.
Performance and Capabilities
The Raspberry Pi 2 delivers exceptional performance and versatility, thanks to the Broadcom BCM2836 SoC. This system-on-chip features a quad-core ARM Cortex-A7 processor running at 900 MHz, offering a significant upgrade in processing power compared to earlier Raspberry Pi models. This boost allows the Raspberry Pi 2 to manage more complex applications, handle multiple tasks simultaneously, and provide a smoother overall user experience.
One of the highlights of the Raspberry Pi 2 is its integrated VideoCore IV GPU. This graphics processor is capable of supporting 1080p video playback and 3D graphics, making it well-suited for multimedia applications such as home media centers and educational tools that need high-quality video. Coupled with 1GB of RAM, it ensures that applications run efficiently and smoothly, even when multiple programs are in use at the same time.
When it comes to connectivity, the Raspberry Pi 2 excels with its four USB 2.0 ports, which allow you to connect various peripherals like keyboards, mice, and external storage devices. The HDMI port makes it easy to connect the Pi to monitors or TVs, providing clear and crisp video output. Additionally, the Ethernet port offers reliable and fast internet connectivity, which is crucial for many online applications and projects.
Power efficiency is another strong point for the Raspberry Pi 2. Despite its enhanced performance capabilities, it maintains low power consumption, making it an excellent choice for projects that need to operate continuously or in environments where energy efficiency is important.
Applications and Use Cases
The Raspberry Pi 2, powered by the Broadcom BCM2836, stands out as a versatile and robust platform that caters to a wide array of applications and use cases. Its impressive performance and connectivity options make it a great choice for both hobbyists and professionals.
Education is one of the most prominent areas where the Raspberry Pi 2 excels. Its affordability and comprehensive features make it an ideal tool for teaching programming, electronics, and computer science. Students can dive into coding with languages like Python, Scratch, and Java, or get hands-on experience by building simple circuits and projects.
Home automation is another popular application. The Raspberry Pi 2 can act as a central hub for a smart home system, managing devices such as lights, thermostats, and security cameras. Its Ethernet connectivity and low power consumption make it suitable for continuous use in home automation setups, providing a cost-effective solution for smart home enthusiasts.
In the multimedia realm, the Raspberry Pi 2 transforms into a powerful media center. By installing software like Kodi, users can turn their Raspberry Pi 2 into a home theater system that streams high-definition video and audio. The VideoCore IV GPU ensures smooth playback of 1080p content, making it perfect for multimedia projects.
The Raspberry Pi 2 also plays a role in Internet of Things (IoT) projects. Its GPIO (General Purpose Input/Output) pins allow users to connect various sensors and actuators, creating smart devices and systems that can collect data, control environments, and interact with other devices over the internet.
Lastly, retro gaming enthusiasts can utilize the Raspberry Pi 2 to relive classic games. With emulation software, it can play games from vintage consoles like the NES, SNES, and Sega Genesis, making it a favorite among gamers wanting to revisit their old favorites.
In essence, the Raspberry Pi 2’s versatility and performance make it a valuable tool across multiple domains, from education and home automation to multimedia, IoT, and gaming.
Setting Up and Getting Started
Getting your Raspberry Pi 2 up and running is a simple process that’s friendly for both beginners and seasoned users. Here’s a step-by-step guide to help you get started:
- Gather Your Materials:
You’ll need the Raspberry Pi 2 board, a microSD card (8GB or larger), a microSD card reader, a USB keyboard and mouse, an HDMI cable, a monitor or TV, and a 5V micro USB power supply. A case for the Raspberry Pi is optional but recommended for protection.
- Prepare the MicroSD Card:
Download the latest version of Raspberry Pi OS (formerly Raspbian) from the Raspberry Pi website. Use a tool like Balena Etcher to write the OS image to the microSD card. Insert the card into the reader, open Balena Etcher, select the OS image, choose the microSD card, and click “Flash” to write the image.
- Connect the Hardware:
Insert the microSD card into the Raspberry Pi 2. Connect the HDMI cable to the Pi and your monitor or TV. Plug in the USB keyboard and mouse, and finally, connect the power supply to the Raspberry Pi.
- Boot Up:
Once everything is connected, plug in the power supply to start the Raspberry Pi 2. The initial boot might take a few minutes as the system sets up. Follow the on-screen prompts to configure your language, keyboard layout, and Wi-Fi network.
- Update the System:
After the initial setup, it’s a good practice to update the system. Open the terminal and run these commands to ensure your software is up-to-date:
sudo apt-get update
sudo apt-get upgrade
- Explore Raspberry Pi OS:
Raspberry Pi OS comes with several pre-installed applications for programming, browsing, and multimedia. Take some time to explore tools like Python, Scratch, and the Chromium web browser to familiarize yourself with the operating system.
- Start Your First Project:
With the basics covered, you’re ready to dive into your first project. Whether you’re interested in programming, home automation, or setting up a media center, the Raspberry Pi community has a wealth of resources and tutorials to guide you.